
Getting It Sharp, Digital SLR!
Digital SLR cameras just keep getting better and cheaper. But they do add more complexity along with the added features. My purpose here is to Keep It Simple (KIS) with the following advice on how to get your photos sharp.
You probably will need to look through the manual that came with the camera to be able to adjust the settings I will be giving you.
Making Sharp Full Face Smile Portraits
The first thing you should do is put you camera in the manual focus mode instead of auto focus. Also, there is an adjustment for the view finder (Diopter) that controls how sharp or soft the image will appear in the view finder. There is usually a dial next to the view finder that you adjust the sharpness of the view finder (check your manual).
The comment I often hear is this "My close-up anterior photos are nice and sharp, but when I back up to do a full face portrait the photos often are out of focus".
Here is the reason for the above: When you are doing close-up anterior photos there is usually enough contrast for the camera to find the proper focus point (this is with the camera in the auto focus mode). You will usually be getting the teeth and some black shadow in the mouth, so the camera has an easy time seeing the contrast. When you move away and do the full face portrait, at times, there is not enough contrast in the persons face for the camera to focus on. This is why you may experience more out of focus photos with full face rather than close-up views.
The good thing here is that the solution is easy. Instead of having the camera decide where to focus when it is in the auto focus mode, switch to manual focus and you decide where to focus. Your results will be more consistent with many fewer out of focus photos.
Another tip is to check the focus of a photo is to enlarge the image in the LCD screen (again consult the manual for your camera to find out how to do this). What may look in focus at first, may become out of focus when you enlarge a portion of the image. This can save you from having to use an inferior photo of the patient or having to call them back into the office to make another photo.
Setting Shutter Speed and Aperture Settings
Now don't panic here, it is not that difficult and I will explain why you should take the camera out of the auto mode and what these settings do.
Shutter Speed:
This is the easiest of the settings to understand. The shutter is controlling how much light is coming into the camera and whether motion will be blurry or sharp. When you hand hold a digital camera inside and do not have the flash turned on and the camera is in the auto mode, the camera will choose a low shutter speed because the light inside is usually low. This could be a 1/60 of a second or lower. In most cases the resulting photo will be blurry because it is difficult to hold the camera steady at low shutter speeds. If the flash does go off you still may get some blurriness. Even though the speed of the flash is around 1/10,000 of a second which should stop any motion, the shutter speed is at a 1/60 or lower and the ambient light in the room will be captured. The resulting picture may look sharp, but you will notice some blurring on the edges. The other effect is the other lights in the room will record and this is why you may see parts of the photo looking yellowish or bluish.
The easy solution to this problem is to set the shutter speed of the camera to 1/250th. This will ensure that the only light being captured by the camera is the light from the flash. You could set the shutter speed even faster if you wanted to with no change in the actual exposure of the photo. This is because the flash is firing off at 1/10,000th of a second and therefore the duration of the flash is shorter that the opening and shutting of the shutter.
Aperture or f stop:

The aperture is like the shutter controlling how much light is coming into the camera and the depth of field (how much from foreground to background is sharp).
Lets talk about how the shutter and aperture control light together first. I will use the analogy of a faucet to illustrate how the two work together. If you wanted to fill a gallon container you would turn the faucet on, this is the shutter. By opening the faucet more or less, more or less water comes out, this is the aperture. If you open the faucet only a small amount you will need to keep the faucet open longer to fill the container. If you open the faucet a large amount, the container is filled quickly. This is exactly how the shutter and aperture work together to control the exposure of a photo. An aperture of 5.6 is a large opening and lets a lot of light in to the camera. An aperture of 22 is a small opening and lets in a small amount of light.
Depth of Field:
The larger the aperture (5.6) the less depth of field you will have or the less will be in focus from near to far in the photo. The smaller the aperture (22) the more depth of field you will have or the more will be in focus from near to far.
As you move closer to an object your depth of field shrinks. If you photograph an object from 10 feet away and are using an aperture like f11, just about everything from foreground to background will be in focus. If you move to within 2 feet of the object, you will notice that the depth of field has shrunk and that the near and far parts of your photo will be out of focus.
Another thing that affects depth of field is the length of the lens. Telephoto lenses will not give great depth of field at a medium aperture (f8). Wide angle lenses will give great depth of field at the same aperture.
Remember the aperture is giving you depth of field from your point of focus. So for close-up photos you want to focus half way into the scene. You get half the depth of field from the point of focus coming towards the lens and half moving away from the point of focus.
Shutter Speed and Aperture Settings for Close-Up and Portrait Photos:
First, the easy setting. Set your shutter speed at 1/250 and leave it there. We will be controlling the light and depth of field by changing the aperture setting. Basically you want a moderate aperture for portrait photos such as f5.6, f8 or f11. For the close-up views you want to set the aperture to f16, f22, or f32 (if you have this aperture on your camera). You will need to experiment with the settings to find out which ones work the best for your camera and environment you are working in. Remember this key point. As you move in closer and closer to your subject the light from the flash will be stronger and stronger. This is one of the reasons why you make the aperture smaller for close-up photos. Once you get well exposed photos, write down the aperture setting you used. As long as yours distance to the subject stays the same, the aperture setting will stay the same.
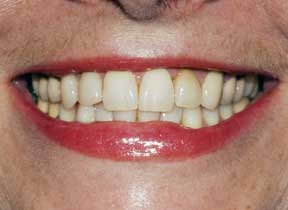
Example Photos Using Same Shutter Speed and Different Apertures
(Photos made with Nikon D200, 100mm Macro Lens and on Camera Flash)
 |
 |
1/250 shutter speed f22 aperture |
1/250 shutter speed f5.6 aperture |
Thank you for your time. If you have any questions you can call me at 866-338-3597
Sam Laundon
SmilePix
Picturing the Perfect Smile
www.smilepix.com
781-577-7700